July 27, 2012

FREE Titanium Backup Pro 4.8.1 TBPatcher v4.7.5 Apk

Android Market's MOST WANTED 5 Star App is now for FREE in LearnTricks.

More Titanium power: Apps freezer, multi backups, 0-click restore and WAY MORE!
O━┳┳┳ · Your PRO Key for Titanium Backup!

• Voted #1 TOP ROOT APP on Twitter.
• Check out the Pro DEMO VIDEO below!
• No icon! Requires the Titanium Backup (free) app (see "More" section below). This key   will turn it into PRO.
• The same key can be used on several devices!

You can backup, restore, freeze (with Pro) your apps + data + Market links. This includes all protected apps & system apps, plus external data on your SD card. You can do 0-click batch & scheduled backups. Backups will operate without closing any apps (with Pro). You can move any app (or app data) to/from the SD card. You can browse any app's data and even query the Market to see detailed information about the app.

Also see the paid PRO key which adds EVEN MORE awesome features such as:

[✔] 0-click batch restores
[✔] Keep multiple backups per app
[✔] Multi-user app data
[✔] Apps freezer
[✔] Dropbox sync
[✔] Convert user apps <=> system apps
[✔] Integrate system app updates into ROM
[✔] Encryption
[✔] Market Doctor
[✔] Hypershell speed
[✔] Backup apps without closing them!
[✔] Restore individual apps+data from CWM backups!
[✔] Market "auto updating" manager
[✔] Dalvik cache cleaner
[✔] Integrate Dalvik cache system elements into ROM
[✔] Unlimited schedules
[✔] Protect backup against deletion
[✔] Send backup by e-mail
[✔] CSV export any app DB (e-mail or Google Docs)
[✔] Convert app data to/from fast WAL format
[✔] WAY MORE!
 

PRO FEATURES ADDED:

[✔] Multiple backups per app
[✔] 0-click batch restore
[✔] Multi-user support for some apps! (eg: games)
[✔] Batch verification
[✔] Backup apps without closing them!
[✔] Restore individual apps+data from CWM backups!
[✔] Hypershell speed
[✔] Migrate system data across different ROMs
[✔] Market Doctor
[✔] Apps freezer (incl. batch support)
[✔] Market "auto updating" manager
[✔] Convert user apps <=> system apps
[✔] Encryption
[✔] Unlimited schedules
[✔] Sync to/from Dropbox
[✔] Protect backup against deletion
[✔] Send backup by e-mail
[✔] CSV export any app DB (e-mail or Google Docs)
[✔] Brand the app with your name
[✔] Bloatware Melter (experimental)
[✔] Convert app data to/from faster WAL DB format
[✔] And more!

MORE MEMORY:

[✔] Dalvik cache cleaner
[✔] Integrate system app updates into ROM
[✔] Move apps into ROM
[✔] Integrate Dalvik cache system elements into ROM


Instructions:

1. Install Titanium Backup and don't run.
2. Install TBPatcher4x (credits to ChelpuS)
3. Press "Press for Activate"
4. Enjoy

* After rebooting if you find batch mode isn't working, please run TBPatcher and activate it again.

Click here to : DOWNLOAD


For Android Downloads & Tricks : Click here | For Hacking tricks : Click here | For How To Do Tutorials : Click here | For Gadget reviews : Click here | For Internet Tricks : Click here | For Windows tricks : Click here.

You can like us on Facebook or Follow us in Twitter to stay connected with us.

FREE GO Locker Circuitry Theme v1.0 apk

Something that is not available through-out the Internet for FREE, we are here to give it to you for FREE. The most amazing lock-screen for Android is here.

GO Locker Theme Circuitry, designed to GO Launcher EX, is available for free now!

GO Locker Theme Circuitry, design to GO Launcher EX, is available now!
Note: Make sure GO locker V1.11 has been installed.

Tips:
1. Make sure GO Launcher EX V2.58 or above and GO Locker v1.11 has been installed;
2. Click “MENU—->Preferences—->Theme Settings—->GO Locker---->"My locker” to choose the theme;

Iif you meet any bugs or want any improvement!
E-mail: golauncher@goforandroid.com


Click here to : DOWNLOAD


For Android Downloads & Tricks : Click here | For Hacking tricks : Click here | For How To Do Tutorials : Click here | For Gadget reviews : Click here | For Internet Tricks : Click here | For Windows tricks : Click here.

You can like us on Facebook or Follow us in Twitter to stay connected with us.

July 26, 2012

Add New Facebook Login Button to a Website/Blog 2012

Now a days you can find a Log-in with Facebook option in lots of website. Well, if you are also owner of a website or blog, its very easy to add a Facebook Log-in button in your own site. Here I am gonna tell you how to do it..


1. Go to Facebook Developer Page. You might be asked to verify your account, choose any of the verification options to complete the verification.
2. Click on : Create a New App. Choose an App name & a valid App Namespace.


3. Click on Edit App and choose Website with Facebook Login option and enter your website/blog URL there.


4. You should then see your application info. Now copy the App ID as indicated in the picture below and save it in a notepad.
 5. Come to your website/blog template and paste this come under the <body> tag.

<div id="fb-root"></div><script 
src="http://connect.facebook.net/en_US/all.js#appId=YOUR_APP_ID&amp;xfbml=1"></script>
 

6. Replace the YOUR_APP_ID in the code above with your App ID provided from Facebook which you copied in Step 4 and save.
7. Now in your website, where you want the log-in button to be appear copy and paste the code below, into it (in case of blog click on " ADD A GAGDET" on the sidebar or any other location you want to add the button to. From the GADGETS list, choose HTML/JAVASCRIPT.  In the title field, you can enter "Login to Facebook" and in the content box, copy and paste the code below, into it).

NOTE: If a visitor to your blog clicks on the "facebook login" button, he/she will not be taken away from your blog. Instead, your blog page will refresh and the "facebook login" button will change to "facebook log out" button.


Only Facebook Log-in Button :
<div style='float:center;'><fb:login-button autologoutlink="True" length="short" background="white" size="large"></fb:login-button> </div>


Facebook Log-in Button with name :
(name will appear after someone log-in)
<div style="text-align: center;">
<h2 class="title">
    Hello <fb:name uid="loggedinuser" useyou="false"></fb:name></h2>
</div>
<div style="text-align: center;">
<div style="font-family: &quot;Trebuchet MS&quot;,sans-serif;">
<div style="font-family: Verdana,sans-serif;">
<h2 class="title">
    <fb:login-button autologoutlink="True" background="white" length="short" size="large"></fb:login-button></h2>
</div>
</div>
</div>


Facebook Log-in Button with Name and Profile Photo:
(Name & photo will appear after someone log-in)
<div style="text-align: center;">
<h2 class="title">
    Hello <fb:name uid="loggedinuser" useyou="false"></fb:name></h2>
</div>
<div style="text-align: center;">
<h2 class="title">
    <fb:profile-pic facebook-logo="true" linked="false" uid="loggedinuser"></fb:profile-pic></h2>
</div>
</div>
<div style="text-align: center;">
<div style="font-family: &quot;Trebuchet MS&quot;,sans-serif;">
<div style="font-family: Verdana,sans-serif;">
<h2 class="title">
    <fb:login-button autologoutlink="True" background="white" length="short" size="large"></fb:login-button></h2>
</div>
</div>
</div>

You can customize this as you wish. If everything is done as it should & then you click on the log-in button a pop-up windows like this would appear. 


It works for WordPress, Blogger, Joomla and any platform or even in simple HTML/pHp webpages. If it works for you, kindly like this post and give comments. If there is any problem then just let me know.

Below here you can experience the whole Log-In thing.


Check-out more services from us -  For Hacking tricks : Click here | For Android Tricks : Click here | For How To Do Tutorials : Click here | For Gadget reviews : Click here | For Internet Tricks : Click here | For Windows tricks : Click here. You can like us on Facebook or Follow us in Twitter to stay connected with us.

Change Facebook Login Page

Hey pals, after a long time I am back in LearnTricks. As I am so busy with my study it's hard to search new tricks everyday. 2day I'm posting an old - known to all - type thing. Well if you are unknown from it then Hurray...
it's good luck for me.


Here I am providing you a quick trick to get  customizable Facebook log-in screen. It's cool, interesting & different.


CAUTION : THIS ONLY WORKS WITH GOOGLE CHROME BROWSER


    in Google Chrome
2. Install this Extension
3. Log-out from Facebook if you already logged in
5. You can see a new type log-in page. You can change the background photo with any photo you want by clicking the Setting icon above the blue Log In button.

Changed Facebook log-in screen.

 To get this photo click here


Check-out more services from us - For Hacking tricks : Click here | For Android Tricks : Click here | For How To Do Tutorials : Click here | For Gadget reviews : Click here | For Internet Tricks : Click here | For Windows tricks : Click here

June 28, 2012

Top 5 DSLR Cameras starts from Rs. 26,000 in 2012

Choosing the best DSLR for your needs can be a decision fraught with difficulties, not least because there are so many capable models on the market that it's hard to know which camera is the top digital camera for your needs.
At one end of the scale manufacturers compete fiercely to provide the easiest entry point into DSLR photography, with intelligent exposure modes and in-camera guides to make the journey as painless as possible, while at the other they battle to deliver the most environmentally-sealed, fastest-shooting models complete with high-resolution sensors, detailed LCD screens and, of course, video recording.

Here I am giving you details about 5 best DSLR cameras now a days inside Rs. 26000 - 36000 according to best of my knowledge.


1. Nikon D3100 SLR with ( AF-S 18-55mm VR Kit Lens) 


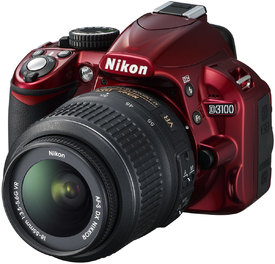
Nikon D3100 is an entry-level DX-format camera, ideal for photographers preparing to refine their skills in DSLR cameras. This camera has a CMOS image sensor of dimensions 23.1 x 15.4 mm, which enables you to capture fabulous images at 14.2 megapixels. The swift EXPEED 2 processing engine of this digital SLR supports an aspect ratio of 3:2. You can record your memories and shoot full HD movies on the Nikon D3100 at 1920 x 1080 resolution (24 fps). 
This Nikon DSLR is compact and easy to carry at 445 g (without battery). The rubber panel on the rear of the camera gives you a firm thumb grip, while the ergonomically designed body with rounded edges lets you hold the camera steady. This Nikon digital SLR has a secure Mode dial which features 13 operating modes. The base of this dial has a lever that lets you switch between Single, Continuous, Self-timer and Quiet modes with one simple flick of the finger.
The D3100 DSLR comes with an AF-S 18-55 mm lens that is fitted on a Nikon F Bayonet mount. This DSLR is compatible with several NIKKOR lenses, thus giving you an opportunity to experiment with several types of lenses. The aperture of this Nikon DSLR ranges from f/3.5 - 5.6, while the shutter speed has a wide range of 1/4000 - 30 seconds. The shutter of the D3100 is an electronically controlled vertical-travel focal plane shutter, and also has a Bulb setting to help you take brighter images even in dim light scenarios.
The camera has a 3x optical zoom, which you can increase by interchanging this lens with another zoom lens. The Nikon D3100 has 11 point auto focus module that promises razor sharp focus and the 3D tracking gives you clearly focused images of a subject in motion.

The light sensitivity of a DSLR reduces the risk of blurry images when taking pictures at faster shutter speeds or dark situations. The Nikon D3100 has a wide ISO range of ISO 100 - 3200 sensitivity which can be boosted up to ISO 12800. You can further brighten your composition by using the built-in pop up flash and the hot shoe for an attaching an external flash.

Best Price: Rs. 29,950


2. Canon EOS 1100D Kit (EF S18 55 IS II) DSLR

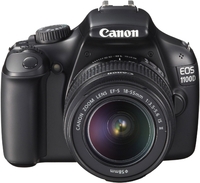
Canon EOS 1100D is an advanced and affordable camera that encourages DSLR beginners with its user friendliness. The high performing DIGIC 4 image processor allows you to freeze fast paced action and take remarkable images at 12.2 megapixels. Built with the APS-C CMOS sensor with dimensions of 22.2 x 14.7 mm, this DSLR camera has an aspect ratio of 3:2. The Canon EOS 1100D has a noteworthy feature of recording videos in HD at 1280 x 720 resolution (30 or 25 fps). The Canon 1100D weighs 495 g and has a comfortable grip. The DSLR has a dedicated button for video recording and flash which lets you switch without any delay. You are also provided with a Q-button which instantly takes you to the menu, where you can tweak the camera settings. This Canon camera has a bright pentamirror viewfinder which lets you frame your photographs accurately and also helps conserve the camera's battery life. The 1100D digital SLR camera also has a 2.7 inch TFT color LCD with a 230, 000 dot resolution which is very helpful in Live View mode

The Canon EOS 1100D lets you experiment with several lenses as it is compatible with all EF and EF-S lenses. The focal length range of the 1100D SLR is 18 - 55 mm, while the aperture ranges from f/3.5 - 5.5. This DSLR camera has a fast and accurate 9 point TTL phase detection auto focus system, thus giving you sharp images every time

Best Price: Rs. 26,999 


3. Canon EOS 1100D Double Lens Kit (EF S S18 55 IS II + EF S 55 250mm IS II) DSLR

The Canon EOS 1100D is one of the finest economical SLR cameras in the market today. The multiple features in this camera are quite supportive for those who are relatively new to SLRs. This camera has a built-in 22.0 x 14.7 mm CMOS image sensor which captures bright and colourful images at 12.20 megapixels.
The EOS 1100D comes with Digic IV image processor which lets you record high resolution HD movies with 1280 x 720 resolution. You can enjoy watching the significant moments of life with an aspect ratio of 3:2.
This interchangeable lens DSLR is compatible with several Sony A-mount and Konica Minolta AF lenses. The A33L comes with SAL 18 - 55 mm basic lens fitted on a Sony A-mount. The aperture of a camera is the lens opening that controls light falling on the image sensor. The aperture range of the SLT-A33L is f/3.5 - 5.6.
The TTL phase-detection auto focus system makes sure your captures are crisp and clear. The Sony SLT-A33L has a 15 point focus model giving you razor sharp images. The light sensitivity range of this Sony DSLR is ISO 100 - 12800.
 Equipped with Cannon EF S 55 - 250 mm IS II Lens: The 1100D camera offers a focal length of 55 - 250 mm. When the 1100D is mounted with the Canon EF S 55 - 250 mm lens, the aperture ranges between f/4 - 5.6. This lens comes with Auto Focus feature. The Optical Image Stabilizer which makes sure that none of your photographs turn out blurry even at maximum zoom.

Best Price: Rs. 36,870


4. Canon EOS 550D Kit

Canon EOS 550D is the latest SLR in the consumer focused EOS camera series. This Canon camera sports a 18 megapixel optical sensor and is capable of shooting at a Full HD resolution (1920x1080). The camera uses a 22.3 x 14.9 mm CMOS sensor powered with a DIGIC 4 processor. The Canon EOS 550D uses the standard 3:2 aspect ratio and is a suitable buy for first time DSLR buyers or enthusiasts. 
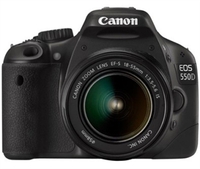
The camera weighs approximately 475g and has dimension of 128.8 x 97.5 x 75.3 mm. This Canon DSLR has a 3-inch TFT colour liquid-crystal screen with 1,040,000 dot pixels. The LCD is dual anti-reflection and anti-smudge, and has up to 10x playback zoom. The Pentamirror Viewfinder covers 95 percent frame and offers 0.87x magnification. In terms of memory and battery, the Canon DSLR camera supports SD/SDHC/SDXC cards and has a Lithium-Ion LP-E8 rechargeable battery, which can take up to 440 shots. The EOS 550D has a Canon EF / EF-S lens mount and has a focal length of 17mm. This SLR camera has a 9 point Auto Focus system and Auto Focus ranges from -0.5 to 18 EV (at 100 ISO). The ISO of this Canon SLR camera ranges from 100 to 6400 on an automatic mode and can be expanded up to an impressive 12,800 with a special ISO option. The camera has auto pop-up retractable built in flash and it also supports external flash with the help of Hot-Shoe. The EOS 550D has shutter speed of 30 - 1/4000 sec and the Aperture ranges from F1.0 - F91.

Best Price: Rs. 32,315


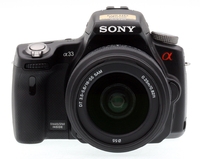
5. Sony SLT A33L (with SAL 18 55mm Lens)

 
Targeting professional photographers, this single lens translucent camera aims at redefining the DSLR market world over. This Sony camera has a CMOS sensor of dimensions 23.4 x 15.6 mm, which enables you to shoot images at 14.2 megapixels. The SLT-A33L lets you take images at multiple aspect ratios of 3:2 and 16:9. You can also record precious memories in Full HD at 1920 x 1080 resolution (25 fps). Another highlight of the Sony SLT-A33L camera is the 3D Sweep Panorama feature, which takes stereoscopic 3D panorama images with a single sweep of the camera.
This DSLR weighs 433 g and is ergonomically designed to give you a firm grip on the camera. The rear panel of the Sony A33L has a 5-way multifunction key as well as a dedicated video recording button to switch quickly from photo to video mode. The top panel holds a Mode Dial and a button to toggle between viewfinder and LCD.
The electronic viewfinder (EVF) of the Sony SLT DSLR can be used for more accurate photo composition. Alternatively, you can use the 3 inch multi-angle TFT LCD screen with 921,600 dot resolution that offers you a pleasing Live View shooting experience.
You can store the images and videos shot on a SD, SDHX, SDXC, MemoryStick Pro Duo memory card. The Sony SLT-A33L runs on a rechargeable Lithium Ion battery pack, capable of taking 270 shots on EVF and 340 shots on LCD when fully charged.
This A33L is built with an electronically-controlled, vertical-transverse, focal-plane shutter that has a shutter speed of 30 - 1/4000 seconds.

Best Price: Rs. 32,953


If you found more good DSRLs in this range please let us know in comments.


For Hacking tricks : Click here | For Android Tricks : Click here | For How To Do Tutorials : Click here | For Gadget reviews : Click here | For Internet Tricks : Click here | For Windows tricks : Click here. You can like us on Facebook or Follow us in Twitter to stay connected with us.

June 16, 2012

Display Pop Up Message in Your Desktop

A pop-up is a graphical user interface (GUI) display area, usually a small
window, that suddenly appears ("pops up") in the foreground of the visual interface.
It is a simple code which will accept the name of the user as well as show
in the pop up message.


First open notepad and write the code below

@ECHO OFF
title LearnTricks.in - Technology Blog
:s
echo Please type your name!!
set /P name=
:disp
cls
title
LearnTricks.in - Technology Blog
msg * "Hello %name%, all your data in this computer are hacked by Aro Mukherji"
msg * "LoL... I am just kidding"
msg * "Thank you for trying this."
msg * "Visit www.learntricks.in again."
:exit


Now save it as "anyname.bat". Then copy and paste it in your friend's startup. Now the message is dispayed each time he switch on his system.

You can change the pop-up messages and troll your friends with serious warnings!!
Have fun................. ;) 

More hacking tricks : Click here    More how to tutorials : Click Here 


Share This Share Heart - Heart Shaped Sharing Widget for Blogger Blogs


I will show you that how this gadget can be added to a blogger hosted blog.
 
1. Click TEMPLATE>EDIT HTML in the dashboard of you Blogger blog.
2.   Look for the following code in the template code by pressing CTRL+F.
</head>
This tag is called the ending HEAD tag.

3. Copy and Paste the following JavaScript code right before the ending head HEAD tag(</head>).


&lt;!-- Start Heart Bookmarking Gadget Code From http://www.learntricks.in/ --&gt;
<script src="http://w.sharethis.com/gallery/shareegg/shareegg.js" type="text/javascript">
   1:  
   2: <br /><script src='http://w.sharethis.com/button/buttons.js' type='text/javascript'/><br /><script type='text/javascript'>stLight.options({publisher: &quot;ur-98d377f-bdd3-9ad1-fbe5-2a678f0a60ee&quot;, onhover:false}); 
</script>
<link href="http://w.sharethis.com/gallery/shareegg/shareegg.css" media="screen" rel="stylesheet" type="text/css"></link>
&lt;!-- Start Heart Bookmarking Gadget Code From http://wwww.learntricks.in/ --&gt;
 
4. Now find the following code in the template of your blog using CTRL+F again.
</body>
This is called the ending BODY tag.

5. Now copy and paste the following code right before the ending BODY tag(</body>).
 
&lt;!-- Start Heart Bookmarking Gadget Code From http://wwww.learntricks.in/ --&gt;
<div style="bottom: 2%; left: 2%; position: fixed;">
<div class="shareEgg" id="shareThisShareHeart">
</div>
<script type="text/javascript">
   1:  
   2: stlib.shareEgg.createEgg(&#39;shareThisShareHeart&#39;, [&#39;facebook&#39;,&#39;twitter&#39;,&#39;pinterest&#39;,&#39;linkedin&#39;,&#39;stumbleupon&#39;,&#39;email&#39;,&#39;sharethis&#39;], {title:&#39; <data:blog.pageTitle/>&#39;,url:&#39;<data:blog.url/>&#39;,theme:&#39;shareheart&#39;});
</script> </div>
&lt;!-- Start Heart Bookmarking Gadget Code From http://wwww.learntricks.in/ --&gt;
 
Now save your template.

You can adjust the position of the gadget by changing the 2% bottom and left  values in the code that you put before the ending BODY tag (</body>) you should do this only if required.

Now you have a great looking heart social sharing gadget in your blogger blog.

May 21, 2012

How to Root Samsung Galaxy Y S5360

UPDATE : Wanna know how to root any Android phone? Then click here -
How to Root Any Android Phone 2.1, 2.2 and 2.3


Is this article needs any crazy intro? If you are looking for the process of how to root your new Samsung Galaxy Y, well you’ve stumbled to the right place! You can root it so easy with this method!

First of all, credits to Aro Mukherji and also Mr. Gambit.

CAUTION : It may void the 1 year manufacturer warranty.


  • Download this file update.zip
  • Copy the ZIP file to the root of your SD-card
  • Turn off your phone
  • Switch ON your device in the recovery Mode (hold power, volume up, home button together)
  • Select update from SD Card option. (use the volume keys for selection)
  • You will see that a list of files will come up. Select the file which is named as update.zip
  • Wait for a few minutes
  • Yappiiee!! Your Galaxy Y S5360 is now rooted successfully!
  • Look for the Superuser app on your device or install an app that requires root access to get confirmed.

To learn how to root any Android Click here. For more Android tricks Click here.

Root Any Android Phone 2.1, 2.2 and 2.3


UPDATE : Do you have Samsung Galaxy Y, then learn how to root it simply -  
How to Root Samsung Galaxy Y s5360


Why you should root your Android phone?


Wait a minute, first let me tell you why you should root your Android. There are always two classes of technology users; those who take and use technology the way it is brought to them, no questions or complaints, while others who want to indulge deep into the very essence of what’s being offered, and want to empower themselves with everything to take the maximum out of that technology. Here I am giving you 10 good reason for rooting Android.

  • Unavailable Features
  • EXTRA APPLICATIONS
  • Multitouch
  • WIFI AND Bluetooth Tethering
  • Better Keyboard
  • APPS From other builds
  • APPS 2 Sd
  • Hardware/Software Interaction
  • Performance Update
  • Because you can! 


I am serious, I consider this a reason. You have a powerful, capable device that you have paid for. You should have the right to modify or change it in any way you like. The device is your property, and you would naturally want to see it working at its maximum potential. Hence the point of rooting.


Remember
  • Do not root your device within warranty period, or your manufacturer warranty may void.
Requirements and Reminders
  • Unlock Root works only on Windows computers. You will need a computer running Windows 7/Vista/XP.
  • Install the USB drivers for your device before you use Unlock Root. You can usually download the drivers from your device manufacturer’s website. Or, if you received a driver CD together with your device, install the drivers using the installer on the CD.

Instructions
  • Download the Unlock Root software. Get it straight from the developer’s website.
  • Enable USB Debugging mode on your device. You can do this by going to Settings > Applications > Development on your device.
  • Connect your device to your PC using a USB cable.
  • Run “UnlockRoot.exe”. Wait for your handset to be automatically detected.
  • Choose your device from the list of autodetected devices.
  • Click the Root button to start the rooting process.
  • Wait for it to complete the installation, after which you’ll be greeted with a message saying your device has been successfully rooted.
  • After the rooting process, simply reboot your device for the changes to take effect.
Congratulations! You have successfully rooted your device. You can check whether or not you have root access by locating the Superuser app on your device or installing an app that requires root access.

If you want tutorials on how to root your particular Android device then tell usin comments, we will provide you at the earliest.

For more Android tricks click here.

Capture Screen on Android Without Rooting

Often you think about capture your Android Smartphone's or tablet's screen, but there is approximately no app for screen capture which works without rooting your device. So, today I am sharing with you the only app I found that actually works without having to root your phone!

It named Screen Capture Shortcut Free. 
You can download it from market via this link : Click here

After installing it on your android open it and set capture from notification to YES.


Here you can also set the time after what it would capture the screen. (here it set as 3.0sec in the photo). Now move back from it & goto the place where you need to capture the screen.
Everythings done? Now drag-on the notification window :


Click on it & it will capture the screen & save it as JPG image inside a folder named ScreenCapture. So this is the coolest app to capture screen on your android. Now capture anything within your screen & share it with your friends.

For mor Android tricks click here. Like us on Facebook to stay connected with us.

May 14, 2012

How to Run Android Apps in Computer


The success of Android operating system is gradually depend upon the apps they are running. Android Market has really very cool and handy Apps which are daily used by millions of people. As the popularity of Smartphone’s and tablets increases, so the uses and dependencies is on the apps available for them. Whether the App is a hot game, a handy price checker, or a useful contact manager, the constraints of Smartphone and tablet designs and interfaces have forced app developers to find creative ways to present and access data. But unfortunately, most apps created for Smartphone’s or tablets aren't available for use on a PC. But here is the solution; there is a one company called BlueStacks in California who releases the Alpha version of app player which is the software or what we say an emulator for the Android Apps. The BlueStacks app player essentially runs an instance of Android in a virtualized environment on the PC, so the apps act as though they're running on a mobile device. So follow the steps below to run the Android Apps in Pc.

Download BlueStacks and Install

Step1: To use the BlueStacks app player, you must first download it from the BlueStacks website.
Step2:  Installer is light weight around 3 MB and it downloads in snap. Just follow the instructions and it install’s in little moment.

Keep in mind that the BlueStacks app player is still in the early phases of development, so you can expect some minor performance issues and perhaps a bug or two.
When the installation is complete, you'll see a short video describing how the BlueStacks app player works and how you can access a few key features, Just skip it.


How It use?

To use BlueStacks and to transfer the android apps from your computer. You’ll have to register for a free BlueStacks account with either a working email address or a Facebook account. The main allure of the BlueStacks app player is its ability to send apps from your Android device to your PC via the company's Cloud Connect mobile app and servers.

 When you register an e-mail address or Facebook account with the BlueStacks app player, the service will link a personal identification number (PIN) to your email account. To transfer apps from your Android device, launch the Android Market on your Android tablet or Smartphone, and search for BlueStacks Cloud Connect. Download and install the Cloud Connect app on your phone or tablet; don't worry-- it's only 402KB. With that app in place, you can send any other app that's installed on your mobile device to the BlueStacks app player on your PC. Essentially, the Cloud Connect app uploads selected apps from your phone to BlueStacks' servers, where you’re PC can then access and download them to your PC.

To use BlueStacks Cloud Connect, simply launch the BlueStacks and select the Android apps on your device that you'd like to upload for transfer to your PC. Then click the Sync button at the top of the interface, and wait for the apps to upload (all of thae apps installed on the mobile device will be listed). The uploaded apps should be visible in the BlueStacks app player on your PC when you launch the 'Get More Apps' tool.

Once your apps are uploaded and the app player has notified you that they're available, select Get More Apps from your BlueStacks app player's PC client and click the Cloud Connect link. From there, a screen should pop up that lists all of the apps you uploaded from your mobile device. Click the Subscribe button underneath each app, and you should be able to run your favorite Android apps from the app player on your PC.
Here what I am running. Hope you like the post and enjoy the Android apps on your computer.

May 13, 2012

Samsung Galaxy Tab 8.9 Specification

Samsung corporation is one of the leading manufacturers of mobile phones and tablet PC’s Specially they are very much capable in android enabled devices. Samsung Galaxy Tab and mobile are the example of that. Samsung Galaxy tab is one of the popular tablets in market after iPad and Samsung tries to beat it with the series of Galaxy tab. In this concern here is Samsung Galaxy Tab 8.9 version is announced by Samsung with some fixed and extra features included within it like better design, good interface and featured web browsing.


Features of Samsung Galaxy Tab 8.9
  • Samsung Galaxy Tab offers the Multi touch screen coupled with 1200*800 pixel resolution which makes a similarity with iPad screen. The multi touch performance is awesome and it surely give you different experience.
  • Samsung Galaxy Tab has android honeycomb 2.3 pre-installed but with a some little tweak we can use the “Ice cream sandwitch” version of android. Use a touchwiz 4.0 apps and made it look like a ice cream sandwitch.
  • There is a feature called Samsung Hub which incorporates Music, Social and Reader inside it and let you to explore and find various contents on web regarding news songs etc.
  • Samsung Galaxy tab has Newly added motion control feature is also impressive and which make easy to enlarge images by panning and titling the device.
Specification of Samsung Galaxy tab 8.9
  • Processor: The Samsung Galaxy Tab 8.9 also has the same 1GHZ dual-core Nvidia Tegra processor found inside the Galaxy Tab 10.1 which ensures a similarly slick web browsing and page loading performance as in Galaxy 10.1.
  • HD support: Yes it is great while playing the HD videos.
  • Camera: 3 megapixel + LED flash on rear and 2 megapixel on front camera which enables you to use skype and messenger easily.
  • Battery: Official tested works 9 hour after charge.
  • Weight and size: 453 gm and 8.6 mm thick.
Pros and cons
  • Lightweight and Good design.
  • The Screen is Brilliant and ideal for tablets.
  • Better alternative of iPad in terms of browsing speed.
  • Touchwiz 4.o enables you to experience the ice cream sandwich version.
  •  No HDMI and usb ports.
  • Sound performance of Samsung Galaxy Tab is poor due to it is located at bottom of the device.
  • Price is high as per the features and specification provided.
Price and availability

Samsung Galaxy tab 8.9 is available in US market and it cost you around 500$ which is also considered as the drawback of this device that its price is literally too high.

Click to Download our Android App