Showing posts with label How To. Show all posts

July 26, 2012

Add New Facebook Login Button to a Website/Blog 2012

Now a days you can find a Log-in with Facebook option in lots of website. Well, if you are also owner of a website or blog, its very easy to add a Facebook Log-in button in your own site. Here I am gonna tell you how to do it..


1. Go to Facebook Developer Page. You might be asked to verify your account, choose any of the verification options to complete the verification.
2. Click on : Create a New App. Choose an App name & a valid App Namespace.


3. Click on Edit App and choose Website with Facebook Login option and enter your website/blog URL there.


4. You should then see your application info. Now copy the App ID as indicated in the picture below and save it in a notepad.
 5. Come to your website/blog template and paste this come under the <body> tag.

<div id="fb-root"></div><script 
src="http://connect.facebook.net/en_US/all.js#appId=YOUR_APP_ID&amp;xfbml=1"></script>
 

6. Replace the YOUR_APP_ID in the code above with your App ID provided from Facebook which you copied in Step 4 and save.
7. Now in your website, where you want the log-in button to be appear copy and paste the code below, into it (in case of blog click on " ADD A GAGDET" on the sidebar or any other location you want to add the button to. From the GADGETS list, choose HTML/JAVASCRIPT.  In the title field, you can enter "Login to Facebook" and in the content box, copy and paste the code below, into it).

NOTE: If a visitor to your blog clicks on the "facebook login" button, he/she will not be taken away from your blog. Instead, your blog page will refresh and the "facebook login" button will change to "facebook log out" button.


Only Facebook Log-in Button :
<div style='float:center;'><fb:login-button autologoutlink="True" length="short" background="white" size="large"></fb:login-button> </div>


Facebook Log-in Button with name :
(name will appear after someone log-in)
<div style="text-align: center;">
<h2 class="title">
    Hello <fb:name uid="loggedinuser" useyou="false"></fb:name></h2>
</div>
<div style="text-align: center;">
<div style="font-family: &quot;Trebuchet MS&quot;,sans-serif;">
<div style="font-family: Verdana,sans-serif;">
<h2 class="title">
    <fb:login-button autologoutlink="True" background="white" length="short" size="large"></fb:login-button></h2>
</div>
</div>
</div>


Facebook Log-in Button with Name and Profile Photo:
(Name & photo will appear after someone log-in)
<div style="text-align: center;">
<h2 class="title">
    Hello <fb:name uid="loggedinuser" useyou="false"></fb:name></h2>
</div>
<div style="text-align: center;">
<h2 class="title">
    <fb:profile-pic facebook-logo="true" linked="false" uid="loggedinuser"></fb:profile-pic></h2>
</div>
</div>
<div style="text-align: center;">
<div style="font-family: &quot;Trebuchet MS&quot;,sans-serif;">
<div style="font-family: Verdana,sans-serif;">
<h2 class="title">
    <fb:login-button autologoutlink="True" background="white" length="short" size="large"></fb:login-button></h2>
</div>
</div>
</div>

You can customize this as you wish. If everything is done as it should & then you click on the log-in button a pop-up windows like this would appear. 


It works for WordPress, Blogger, Joomla and any platform or even in simple HTML/pHp webpages. If it works for you, kindly like this post and give comments. If there is any problem then just let me know.

Below here you can experience the whole Log-In thing.


Check-out more services from us -  For Hacking tricks : Click here | For Android Tricks : Click here | For How To Do Tutorials : Click here | For Gadget reviews : Click here | For Internet Tricks : Click here | For Windows tricks : Click here. You can like us on Facebook or Follow us in Twitter to stay connected with us.

Change Facebook Login Page

Hey pals, after a long time I am back in LearnTricks. As I am so busy with my study it's hard to search new tricks everyday. 2day I'm posting an old - known to all - type thing. Well if you are unknown from it then Hurray...
it's good luck for me.


Here I am providing you a quick trick to get  customizable Facebook log-in screen. It's cool, interesting & different.


CAUTION : THIS ONLY WORKS WITH GOOGLE CHROME BROWSER


    in Google Chrome
2. Install this Extension
3. Log-out from Facebook if you already logged in
5. You can see a new type log-in page. You can change the background photo with any photo you want by clicking the Setting icon above the blue Log In button.

Changed Facebook log-in screen.

 To get this photo click here


Check-out more services from us - For Hacking tricks : Click here | For Android Tricks : Click here | For How To Do Tutorials : Click here | For Gadget reviews : Click here | For Internet Tricks : Click here | For Windows tricks : Click here

June 16, 2012

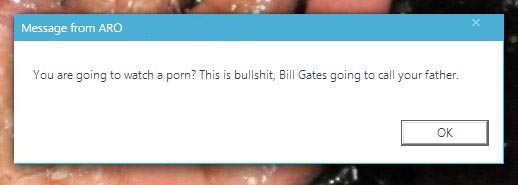
Display Pop Up Message in Your Desktop

A pop-up is a graphical user interface (GUI) display area, usually a small
window, that suddenly appears ("pops up") in the foreground of the visual interface.
It is a simple code which will accept the name of the user as well as show
in the pop up message.


First open notepad and write the code below

@ECHO OFF
title LearnTricks.in - Technology Blog
:s
echo Please type your name!!
set /P name=
:disp
cls
title
LearnTricks.in - Technology Blog
msg * "Hello %name%, all your data in this computer are hacked by Aro Mukherji"
msg * "LoL... I am just kidding"
msg * "Thank you for trying this."
msg * "Visit www.learntricks.in again."
:exit


Now save it as "anyname.bat". Then copy and paste it in your friend's startup. Now the message is dispayed each time he switch on his system.

You can change the pop-up messages and troll your friends with serious warnings!!
Have fun................. ;) 

More hacking tricks : Click here    More how to tutorials : Click Here 


Share This Share Heart - Heart Shaped Sharing Widget for Blogger Blogs


I will show you that how this gadget can be added to a blogger hosted blog.
 
1. Click TEMPLATE>EDIT HTML in the dashboard of you Blogger blog.
2.   Look for the following code in the template code by pressing CTRL+F.
</head>
This tag is called the ending HEAD tag.

3. Copy and Paste the following JavaScript code right before the ending head HEAD tag(</head>).


&lt;!-- Start Heart Bookmarking Gadget Code From http://www.learntricks.in/ --&gt;
<script src="http://w.sharethis.com/gallery/shareegg/shareegg.js" type="text/javascript">
   1:  
   2: <br /><script src='http://w.sharethis.com/button/buttons.js' type='text/javascript'/><br /><script type='text/javascript'>stLight.options({publisher: &quot;ur-98d377f-bdd3-9ad1-fbe5-2a678f0a60ee&quot;, onhover:false}); 
</script>
<link href="http://w.sharethis.com/gallery/shareegg/shareegg.css" media="screen" rel="stylesheet" type="text/css"></link>
&lt;!-- Start Heart Bookmarking Gadget Code From http://wwww.learntricks.in/ --&gt;
 
4. Now find the following code in the template of your blog using CTRL+F again.
</body>
This is called the ending BODY tag.

5. Now copy and paste the following code right before the ending BODY tag(</body>).
 
&lt;!-- Start Heart Bookmarking Gadget Code From http://wwww.learntricks.in/ --&gt;
<div style="bottom: 2%; left: 2%; position: fixed;">
<div class="shareEgg" id="shareThisShareHeart">
</div>
<script type="text/javascript">
   1:  
   2: stlib.shareEgg.createEgg(&#39;shareThisShareHeart&#39;, [&#39;facebook&#39;,&#39;twitter&#39;,&#39;pinterest&#39;,&#39;linkedin&#39;,&#39;stumbleupon&#39;,&#39;email&#39;,&#39;sharethis&#39;], {title:&#39; <data:blog.pageTitle/>&#39;,url:&#39;<data:blog.url/>&#39;,theme:&#39;shareheart&#39;});
</script> </div>
&lt;!-- Start Heart Bookmarking Gadget Code From http://wwww.learntricks.in/ --&gt;
 
Now save your template.

You can adjust the position of the gadget by changing the 2% bottom and left  values in the code that you put before the ending BODY tag (</body>) you should do this only if required.

Now you have a great looking heart social sharing gadget in your blogger blog.

May 21, 2012

How to Root Samsung Galaxy Y S5360

UPDATE : Wanna know how to root any Android phone? Then click here -
How to Root Any Android Phone 2.1, 2.2 and 2.3


Is this article needs any crazy intro? If you are looking for the process of how to root your new Samsung Galaxy Y, well you’ve stumbled to the right place! You can root it so easy with this method!

First of all, credits to Aro Mukherji and also Mr. Gambit.

CAUTION : It may void the 1 year manufacturer warranty.


  • Download this file update.zip
  • Copy the ZIP file to the root of your SD-card
  • Turn off your phone
  • Switch ON your device in the recovery Mode (hold power, volume up, home button together)
  • Select update from SD Card option. (use the volume keys for selection)
  • You will see that a list of files will come up. Select the file which is named as update.zip
  • Wait for a few minutes
  • Yappiiee!! Your Galaxy Y S5360 is now rooted successfully!
  • Look for the Superuser app on your device or install an app that requires root access to get confirmed.

To learn how to root any Android Click here. For more Android tricks Click here.

Root Any Android Phone 2.1, 2.2 and 2.3


UPDATE : Do you have Samsung Galaxy Y, then learn how to root it simply -  
How to Root Samsung Galaxy Y s5360


Why you should root your Android phone?


Wait a minute, first let me tell you why you should root your Android. There are always two classes of technology users; those who take and use technology the way it is brought to them, no questions or complaints, while others who want to indulge deep into the very essence of what’s being offered, and want to empower themselves with everything to take the maximum out of that technology. Here I am giving you 10 good reason for rooting Android.

  • Unavailable Features
  • EXTRA APPLICATIONS
  • Multitouch
  • WIFI AND Bluetooth Tethering
  • Better Keyboard
  • APPS From other builds
  • APPS 2 Sd
  • Hardware/Software Interaction
  • Performance Update
  • Because you can! 


I am serious, I consider this a reason. You have a powerful, capable device that you have paid for. You should have the right to modify or change it in any way you like. The device is your property, and you would naturally want to see it working at its maximum potential. Hence the point of rooting.


Remember
  • Do not root your device within warranty period, or your manufacturer warranty may void.
Requirements and Reminders
  • Unlock Root works only on Windows computers. You will need a computer running Windows 7/Vista/XP.
  • Install the USB drivers for your device before you use Unlock Root. You can usually download the drivers from your device manufacturer’s website. Or, if you received a driver CD together with your device, install the drivers using the installer on the CD.

Instructions
  • Download the Unlock Root software. Get it straight from the developer’s website.
  • Enable USB Debugging mode on your device. You can do this by going to Settings > Applications > Development on your device.
  • Connect your device to your PC using a USB cable.
  • Run “UnlockRoot.exe”. Wait for your handset to be automatically detected.
  • Choose your device from the list of autodetected devices.
  • Click the Root button to start the rooting process.
  • Wait for it to complete the installation, after which you’ll be greeted with a message saying your device has been successfully rooted.
  • After the rooting process, simply reboot your device for the changes to take effect.
Congratulations! You have successfully rooted your device. You can check whether or not you have root access by locating the Superuser app on your device or installing an app that requires root access.

If you want tutorials on how to root your particular Android device then tell usin comments, we will provide you at the earliest.

For more Android tricks click here.

Capture Screen on Android Without Rooting

Often you think about capture your Android Smartphone's or tablet's screen, but there is approximately no app for screen capture which works without rooting your device. So, today I am sharing with you the only app I found that actually works without having to root your phone!

It named Screen Capture Shortcut Free. 
You can download it from market via this link : Click here

After installing it on your android open it and set capture from notification to YES.


Here you can also set the time after what it would capture the screen. (here it set as 3.0sec in the photo). Now move back from it & goto the place where you need to capture the screen.
Everythings done? Now drag-on the notification window :


Click on it & it will capture the screen & save it as JPG image inside a folder named ScreenCapture. So this is the coolest app to capture screen on your android. Now capture anything within your screen & share it with your friends.

For mor Android tricks click here. Like us on Facebook to stay connected with us.

May 13, 2012

How to Install PlayBook OS 2.0


Research in motion finally Announced it PlayBook Os 2.0. This update is gonna cover all the weakness and drawbacks of PlayBook Os 1.0. This operating system includes many of the features that blackberry user’s were hoping to find in the last version, including a native e-mail client with a classy inbox, and built-in calendar and contacts applications. As in the PlayBook OS 1.0 there is no addition of native e-mail, calendar, or contacts applications but Research in motion is going to update them in this new version of PlayBook OS. User’s feel many issue in Playbook OS 1.0 to access the email and contact and if they wanna do that then they need to connect it to their cell phones and synchronize it. Little bit hectic process..!


What’s new in this..!

  • BlackBerry Messenger which is one of the best instant messaging program is now included in this Update. Yes it wasn’t there in the PlayBook OS 1.o.  Now BlackBerry user’s can enjoy this great feature of BlackBerry.
  • Addition of calendar and contacts apps and native email system.
  • RIM has added social integration like Facebook, Twitter, and LinkedIn can be directly access from the device.
  • New addition of Remote control features that lets you to use your device as keyboard and mouse.
  • This update let you to communicate your device with handset by using the Bluetooth.
  • It support some popular app’s of Android too, not all but some of them.
  • There is thousands of app are added for the playbook in the Rim Store and you can get it from there.
This is available for free for the PlayBook user’s and they can update it from there device. Here i found a video that may help you to install it on your playbook Device.
This Update is really impressive and useful for PlayBook user’s. Update it and Use it. If you have any doubt regarding  this then ask it in comments and share it as much as you can..!!


Convert File Format Without Using Any Software


Converting a File into different format is our day-to-day need, we use to convert various video formats to make a compatibility with our Phone or sometime we used to convert it to save our Disk Size. Same is in case of the Images; we use to convert the Image to .PNG or other suitable format to save the Disk Space or to make the image light weight to send online via mail. It happened to me many times that I wrote the Document to Other file format and trying to open it to Microsoft Word or in some other editor but can’t succeeded as it won’t allow and not supported that format. So for that I used to download the converter to make that document compatible to Microsoft word or for some other editor.
Here I found something which is really a good one and time-saving. The website called zamzar.com is the online utility which is basically an online format converter. Yes you can convert almost all type of Docs, images, videos into a format which you wish.”zamzar.com” is supporting various useful formats; some of popular are listed below:
  • Convert a .jpg image into a .png, .gif, or .bmp, etc.
  • Convert a YouTube video into a .avi, .mov, .3gp, .flac, .m4a, .wmv, etc.
  • Convert a .docx to a .doc, .pdf, .html, etc.
  • Convert a .pdf into an e-book format your e-reader supports.
  • Convert a .rar into a .zip
So here you go a simple tutorial of the Format conversion using the zamzar. I want to convert a file say any PNG image to JPG file. Let show you how to do it.
  • Visit the zamzar.com
  • Scroll down and you will see a Tab interface which has some options like choose a file and select the converting format etc.
zagzar utility How to convert the File Format without using any software
  • Select the Appropriate file (I prefer you to use some small size image to test rather than the HD Video). Once you selected a file it shows you the selected file on a bottom of page.
file to convert How to convert the File Format without using any software
  • Now select the Format on which you wish you convert your file and enter your mail ID. Mail id is for sending the Converted File.Here what i choose.
selection of file How to convert the File Format without using any software
  • Now once you done with uploading the click on convert Button. Once you click there a window pop ups (as shown below ) and it will alert you about your operation. Just click on Ok.
alert of page How to convert the File Format without using any software
  • Now zamzar upload your File on their web server and convert them into a format which you have been selected. Just wait for a minute.Once the conversion completes then it alert you about the process.
fileuploadcomplete How to convert the File Format without using any software
  • Now once the conversion completes then they will send you a mail containing your appropriate data. Check your mail and download the file. Here what I got in my account.
mymail How to convert the File Format without using any software

So that’s all for now. Hope you enjoy this article and this website too. Convert any File format to other without caring about special tools and Hazards of installation.

May 9, 2012

How To Change Windows7 Password Without Knowing It

If you ever forget your password in windows 7, then don't be panic. By this simple process you can easily change your Windows 7 password without knowing current password.
Click on Start menu and search CMD and in the CMD icon, Right click on it and click on Run as administrator.

  • In the DOS window type the below command and hit Enter.

net user Account Name Your New Password
  • In this command Account Name is your current account name which password you want to change and after that your New Password which you want to set.

  • After typing the command click enter button, a message will show "The command completed successfully" . Now you are done.
You can try this method with your friend’s computer. This trick will reset your password.

May 8, 2012

Create Smileys From Your Own Photos In Facebook


Update : If you want some ready-made cool big Facebook smiles : Click Here


  • First go to Smileyti.me.
  • Now choose a image file which you want to make smiley, then fill the captcha and press Upload Now botton.     

After complete the uploading process you will get a code.
This is your smiley code. Click on Copy To Clipboard button to copy the code.
You can put the code in Facebook chat box. This is a amazing tool for making simple and animated smiley codes.

Share It Guys... & for more cool Facebook Tricks click here !!

For Hacking tricks : Click here | For Android Tricks : Click here | For How To Do Tutorials : Click here | For Gadget reviews : Click here | For Internet Tricks : Click here | For Windows tricks : Click here.
You can like us on Facebook or Follow us in Twitter to stay connected with us.

How To Change Security Question On Facebook For Account Security 2012

You can change your facebook security question by following these steps.

 For this first go to facebook.com and click on Forgot your password?
and then on the below screen enter your email or username then click on search.


when they found you, on below screen click on This is My Account


On next screen click on "No longer have access to these"


 On next screen they'll ask you for a new email-id, enter email-id and click on submit


 Next they will ask you current answer to security question, enter it and click on submit


On next screen enter new password (but do remember your old password for this trick)


 Now a message will so that your identity is proven


Once your password is updated on previous screen open one more tab in your browser open facebook.com.and login with your old passward. Then a message will so you that your account is temporarily locked. Click on "This wasn't me".


Then on  next screen secure your account, click on"Secure my account".


 Now click on continue


On next screen, create new password (remember this one )


 now click on continue.


select your email and click on submit.


 check "Only I know the password for *******"
(change your email account's password if needed)
 click on continue


Don't wanna remove any app you use one facebook just click on continue

 Now a screen shows that Set a new security question.now you can change your security question and
answer  update it and click on submit


.your account is unlocked 


Now You Can Login with your new password.


 Lets enjoy friends....

May 7, 2012

How To Hide Email In Facebook For More Security

Today I'm posting about how to hide your Email address In Facebook. Most Of Accounts Hacked by their Email address. You can hide your Email address by
Follow These Steps-

  1. Login To Your Facebook Account.
  2. Go To Your Profile And Click Update Info.
  3. Then Scroll Down With Mouse, Find Contact Info And Click On Edit.
  4. Then Change Email Settings, Select Only Me From Drop Down Menu With Lock Icon.
  5. Click Save Button To Save Changes.

May 6, 2012

How To Add Security Question On Facebook

Security question is a useful way to verify you own your Facebook account if you ever lose access to it.

You can add a security question to your account from your Security Settings page:
  1. Click the account menu at the top right of any Facebook page and choose Account Settings.
  2. From the left column menu, click Security.
  3. Click on the Security Question section and follow the onsite steps. Note: You won't see this section if you've already added a security question to your account.
Tips for picking a good security question:
  • Pick a question and answer you know you'll remember
  • Keep your security question a secret
  • Make sure your answer is specific enough that it can't be guessed easily

You can improve the overall security of your account by updating your security information.

Click to Download our Android App