Showing posts with label Windows 8. Show all posts

June 16, 2012

Display Pop Up Message in Your Desktop

A pop-up is a graphical user interface (GUI) display area, usually a small
window, that suddenly appears ("pops up") in the foreground of the visual interface.
It is a simple code which will accept the name of the user as well as show
in the pop up message.

First open notepad and write the code below

@ECHO OFF
title LearnTricks.in - Technology Blog
:s
echo Please type your name!!
set /P name=
:disp
cls
title
LearnTricks.in - Technology Blog
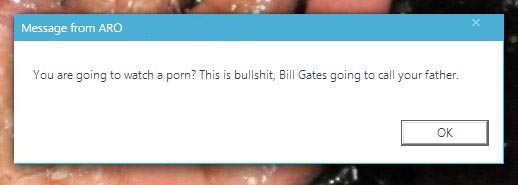
msg * "Hello %name%, all your data in this computer are hacked by Aro Mukherji"
msg * "LoL... I am just kidding"
msg * "Thank you for trying this."
msg * "Visit www.learntricks.in again."
:exit


Now save it as "anyname.bat". Then copy and paste it in your friend's startup. Now the message is dispayed each time he switch on his system.

You can change the pop-up messages and troll your friends with serious warnings!!
Have fun................. ;) 

More hacking tricks : Click here    More how to tutorials : Click Here 


March 27, 2012

Transform Windows 7 into iOS with iOS Skin Pack

If the appearance of the iPhone, iPad and iPod is lost and you want to have similar appearance on your Windows PC then iOS Pack is the best choice for you. It’s a transformation pack that helps you to bring Apple’s iOS devices look of to your Windows 7 computer. iOS Skin Pack changes the overall appearance of the operating system including boot screen, login screen and Windows Explorer. The package also includes cursors, wallpaper, icons, visual style and some extras. Below are the steps for transforming Windows 7 into iOS with iOS Skin pack.

  1. Before installing iOS Skin Pack on your computer, you should create a system restore point, disable the User Account Control (UAC) and close all open programs.
  2. After performing the above recommendations, just download iOS Skin Pack and run the file setup (exe) that you downloaded to start installing the packet processing on your computer.
  3. The installer offers quick installation (Quick) and Custom (Custom). The custom installation allows you to select the components of the packet processing you want to install on your PC.
  4. The package also includes the UxTheme Patch file needed for the installation of third-party themes in Windows 7.
     5.After completing installation, restart your computer to apply the look of Windows 7 iOS.

How to Transform Windows 7 into iOS with iOS Skin Pack


Check-out more services from us -  For Hacking tricks : Click here | For Android Tricks : Click here | For How To Do Tutorials : Click here | For Gadget reviews : Click here | For Internet Tricks : Click here | For Windows tricks : Click here. You can like us on Facebook or Follow us in Twitter to stay connected with us.

March 20, 2012

Recover Old Deleted Files via Tuneup Utilities

In previous post I have already told about Tuneup Utilities 2012 Free 
Now to Recover permanently deleted
 items by TuneUp utility 2012 you have to follow these steps:
STEP 1- Open Tuneup Utilities 2012 and click on 'Restored deleted files'.


STEP 2-Select drive from which you want to recover the files.


STEP 3-a box will open 'what to you want to
 search for'.
Now click on 'show only files in good condition'.


STEP 4-You got the result of permanent deleted files just
 select from that data (You can multiple select files to recover)


STEP 5-Now click on 'Restore' option.
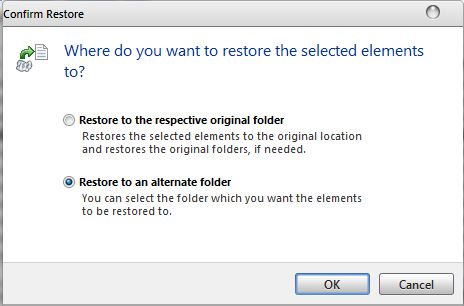
STEP 6-Now you have to select the folder to restore the files.


STEP 7-You can save the files in desktop.


njoy frnds.......:)

March 17, 2012

Nokia to release a Snapdragon-powered 10″ Windows 8 tablet in Q4


We’ve heard so many rumors of Nokia jumping on the tablet bandwagon that we are not sure what to believe anymore, but this latest bit sound rather plausible. The Finns are reportedly working on a 10″ slate running Windows 8, which should arrive to the market by the end of the year.

The Nokia tablet will be powered by a Qualcomm Snapdragon S4 chipset, featuring a couple of Krait CPU cores. The production of the device itself will be outsourced to the Taiwanese company Compal Electronics and initial volumes are said to be the rather modest 200,000 units.

March 8, 2012

Add Shutdown, Restart and Log Off Tiles in Windows 8 Start Screen

Regardless of whether you are an Apple lover, Google guru or an old faithful Microsoft worshipper, the current technological climate represents an excellent time to be involved in, as a user of hardware and software. The majority of the major players in the tech business seem to have some exciting new pieces of kit about to hit the public eye, with Apple set to imminently launch the new iPad and possibly Apple TV, Google looking likely to seed their new Android Jelly Bean in the coming months and Microsoft finally releasing the Consumer Preview of their new Windows 8 operating system.

How to Shutdown, Restart or Log Off in Windows 8

As Amit Agarwal said on labnol.org:

The regular approach I this. As there are no “shutdown” buttons in Windows 8, you can switch to the desktop view and press Alt+F4 to bring the Shut Down menu or the other option is that you press the shortcut key Win+C, go to Settings –> Power –> Shut down.
That’s too many steps especially when you are in a dual-boot environment and need to switch from one OS to another.
Wouldn’t it more convenient if you could create simple tiles – like any other metro app – and place them on the Windows 8 desktop so that you can Shut down, Log off or Restart your Windows 8 computer with a simple click (or tap).
Enter CreateButtons.vbs – this is a simple utility (or rather a script) that will automatically add Shut Down and other related buttons to your Windows 8 screen. There’s no installation required – just download the file to your desktop and double-click to create the various buttons.

Also, here’s the full source code of the VB script in case you are curious to know what it does behind the scenes. It may not be the most efficient piece of code but it will do the trick.

March 4, 2012

Enable Windows 8 Metro UI in Windows 7 | Enjoy Windows 8 on your Windows 7


Although Windows 8 Pre Beta a Developer's Preview is available for user's to download from the Microsoft MSDN Website. The Pre Beta version may not be stable and may cause errors to your regular machine. Its highly recommended not to install the pre beta version on productive machines. To download yourself a copy of the Developer's Preview please go to Windows 8 Developer's Preview ISO Downloads

This article will show you how to install the Metro UI of windows 8 on to your windows 7 operating systems. The steps are easy and quick. 


This is how my Windows 7 desktop looks like. This is as similar to the Windows 8 UI. You can modify or alter the settings of the tiles as per your requirements. You can get your gmail or hotmail account live on the tiles. Internet Explorer, Picture slides, Computer and many more. Apart from this you will also get all the restart, sleep, logoff and shutdown buttons right on this interface. So what are you waiting for just follow the steps below :

Step 1. First download a copy of Rain meter on your Windows 7 OS according to your 32 or 64 bit system.

Step 2. If its in a Zip file, normally it won't if you download it from the rain meter website itself. But if its in a Zip file, extract those and install as per instructions available.

Step 3. After you are done installing, Download the theme Omnimo 3.1 skin for rain meter.

Step 4. Extract the file and double click on omnimo.rmskin and follow the instructions accordingly.

Step 5. Once you are done installing the theme or skin as well. Kindly configure the tiles as per your requirements. That's it you are done installing the Windows 8 Metro UI on Windows 7.

Windows 8 HD Wallpapers


Its almost 3 weeks after Microsoft launched the Pre Beta Developer's Preview and made it available to all the user's worldwide. Here is a collection of some magnificent wallpapers randomly found by the geek from the worldwide web. The authors of the wallpapers have not been identified but with all the due respect from us we would like to give our readers  a collection of some varieties of Windows wallpaper's. Some Wallpaper's are the Official one's that you would get from the Developer's Preview.
So what are you waiting for just check them out.
First Seven Wallpaper's are the one's that you would get along with the Developer's Preview. 
 
Click To Enlarge and Save


Some Unofficial One's


Hope you liked the collection. We would like to thank all the individual authors of the wallpapers.
 

February 3, 2012

Remove BIOS Password

There are a lot ways to Crack the BIOS password. This is one of them but I would say that this one is more effective than the rest because the rest of the ways does not Guarantee you that it will Crack the BIOS password while in this case the Cracking is Guaranteed since in this we will remove the functionality of password protection of the BIOS.


Follow the steps below:
 
1) Boot up windows.
2) go to dos-prompt or go to command prompt directly from the windows start up menu.
3) type the command at the prompt: “debug” (without quotes)
4) type the following lines now exactly as given
o 70 10
o 71 20
quit
exit
4) exit from the dos prompt and restart the machine.

NB : I tested this in Award BIOS. There seems to be some issue regarding display drivers on some machines if this is used. Just reinstall thedrivers, Everything will be fine. I have not found any other trouble if the codes are used. To be on safe side, just back up your data. The use of this code is entirely at ur risk. It worked fine for me.

January 3, 2012

How is Windows 8 : On Hands Review by Aro Mukherji


Computing Experience Redefined
How is Windows 8 : On Hands Review by Aro Mukherji

Windows 8 developer build was unveiled recently at BUILD Conference officially by Microsoft and now available for download. Attendees got a chance to have hands-on Windows 8 Tablet. So, here are first impressions of Windows 8 as Operating system.

Windows 8 is dual faced, first one called Metro built for Tablets and other for Desktop. Tap the tile called Desktop, and a Windows desktop which looks a lot like Windows 7 appears. This is where the dual personality comes in.
From the moment we turn on a tablet with Windows 8 we realize what is new in Microsoft system: Homescreen. Just unlock the system and have a quick view of the new notifications: mail notifications, calls, messages and calendar events.


In the HomeScreen (i.e. DESKTOP) Each application has its own tile shere you can display the information you want: photos, emails, feeds RSS… In addition, applications can create additional tiles. For example, within an application feeds RSS could create an additional tile on screen with information on a specific feed.

Metro applications, A different Experience

Though we already went through all Windows 8 Feature list revealed officially. Microsoft wanted applications to be centric in Windows 8. Instead of letting each developer to make the application as he pleases, Microsoft offers a similar experience between applications.
The first is that all applications are Metro Full Screen. No taskbar, no menu bar. Everything is the application, no commands, only content.
From any application, you can access a shortcut menu by sliding your finger from the right edge inward. There are several options: Search, Sharing, Home, Devices, and Settings. In Settings you can quickly change some system settings (volume, brightness, notifications, Internet …).

Windows 8 Picture Management

Fortunately, Microsoft has learned from Windows Phone 7 and the Picture Management is much better than in the mobile. We can organize them into groups, and pick the size (small or large) to give more or less importance. Nor do we have to worry if we have a very large list of tables. Instead of horizontally sliding for a while, we’ll just zoom out with two fingers, move a bit and return to normal size.


Microsoft is also committed to some changes in what refers to touch gestures. In Windows 8, thelong tap on an item is replaced with a “swipe down”: slide your finger down on an item. On the home screen, for example, a swipe down on a table would show the options menu of the picture.
Along with this, Windows 8 Explorer is also revamped with Aero and Ribbon Interface, tweaked for more productivity.

Multitasking Windows 8 Metro

Multitask is also present Metro. To go to the previous application, just slide your finger from the left edge and move to the previous application. This is not very accomplished: it misses a view of all open applications that are accessed through the touch interface.
In mobile tablet and we got used to the single-tasking, only one task on the screen at the same time. In Windows 8 this is not true: you can drag an application from the left edge to the side. Thus, we have two applications on the screen, The main occupying two thirds of the screen, and a secondary occupying the other third. A great idea if you want to Twitter while reading RSS or the calendar while you are on the mail to give two examples.

Internet Explorer 10

Applications are no longer alone, they are all interconnected

Microsoft changes the concept of operating system in the sense that it’s not just the computer that allows applications to function. Now, applications are connected to each other and with the system.


A clear example is the possibility of share anything from any application. In the shortcut menu have the Share button. Pressing can send the content we’re looking for any other application. For example, we send a photo via Twitter, or email article to a friend, very similar to what makes Android. In addition, we have the common stock on hand which facilitates the task.
The search also happens to be a connection of all applications and not just something that the system offers. We have the traditional search of files, applications and settings, yes. In addition, we can look into the applications. Through the search button shortcut menu, you can click on the application that interest us, and find content there. For example, searching on Twitter or Facebook from the normal search interface by simply choosing that application from the menu.
The file system is very similar. In addition to traditional Windows, you can access the files provided by applications. We can access, for example, photos on Flickr or we Skydrive like a directory without having to do anything special.

Keyboard, mouse, stylus, finger: Windows 8 is ready for everything

Microsoft has taken into account all possible input methods on Windows 8. Your new system works great with anything that comes to mind: keyboard, mouse, stylus or finger.

Windows 8 Touch Keyboard
The Touchpad is very well managed. It has automatic spell checking and word suggestions. We can also use it as a normal keyboard or both thumbs on the keyboard mode separately.
Of course, we can also use the keyboard and mouse as normal. The only difference with respect to use your finger to see is that the bar of the application or previous application will have to click on the border instead of sliding, and the shortcut menu appears in the lower left corner by pressing the Windows keyboard.
And if we are to use pencils to the screen, we can do. Most of the time it is as if we used the finger, except handwriting recognition. It works really well, and changing the way we can use the keyboard. Very convenient if you have a stylus.

All Windows 8 Devices will sync in Cloud

Microsoft also wants to have same experience on any device. Our user accounts associated with Live IDs, and our user accounts, including our photo, backgrounds and settings will be synchronized via Internet.
Our mail and calendar are also connected in the cloud, either with Windows Live, Exchange or Google (not sure it is, but there is no reason to think that not included). You can also synchronize your contacts in Windows Live, Facebook, Twitter and LinkedIn, and chat with them regardless of the service they use.

Bottomline – They have really re-invented Windows

From all above What all I understand is Microsoft has taken seriously the user experience, have thought about what is the easiest way to use the computer and have implemented it very well.
Metro have ventured to have done something totally different from what he had and they have gone great. Have unified system experience, homogenizing and interface applications. And all this without forgetting the traditional Windows, applications might not work in Metro. They have combined really well and I must say that I am very surprised.

Download Windows 8 Developer Preview 
Windows Developer Preview is a pre-beta version of Windows 8 for developers and not recommended for daily use. If you too want to have a sneak peek then download it from official site for Free!

How to Dual Boot Windows 8 and 7 clean installation without DVD easily

If you think Installing Windows 8 overwriting current installation wouldn’t be a good idea then Dual Booting it with Current Windows 7 is a perfect alternative. Even Windows 8 in Virtual Environment won’t give that good experience so, follow this guide to easily install dual boot Windows 8 without need of DVD.

Windows 8 Dual Boot Installation Requirements

You need Windows 8 ISO Image and Virtual CD / DVD Drive installed on Computer. This can be done with software like Virtual CD, Daemon Tools, Magic ISO or anything similar which supports mounting ISO CD Images.

Create Hard Disk Partition for Windows 8 Installation

First of all, make a separate Hard Disk Partition for Windows 8 installation.
Go to Disk Managenemt. Right Click on My Computer and click on Manage >> Disk Management.
Find any Hard Disk Partition with more than 25GB space free. Right click on it and Shrink. Enter the amount to shrink in MB = 20480 (20 GB is minimum requirement of Windows 8)

Shrink Existing HDD Partition
Click on newly created unallocated space of size 20GB and create new Simple Volume.
New Simple Volume Wizard will open. Keep the File system as NTFS and Give name as “Windows 8″ which will make recognizing easier at later stage. Don’t forget to check on Quick Format.

Create New Partition for Windows 8
Now, Partition has been created and we are ready to install Windows 8 on it.

Install Windows 8

Mount Windows 8 ISO Image – In my case, I have use Magic ISO which supports Mounting ISO from Tray icon. As soon as Mounting is successful, Autorun will start but close it.

Mount Windows 8 ISO
Open the DVD and navigate to /Sources folder where you will find Setup.exe

Run the Setup and Select to make “Custom Installation” instead of Upgrading current installation. This installs a fresh copy of Windows 8.
When asked “Where to Install Windows 8” Select the Partition which you created in above steps and Press Next.

Select Windows 8 Installation Partition
Installation begins with copying of files and then Computer will automatically restart. On Reboot, Loader will give two options- Windows Setup and Windows 7. Select “Windows Setup” and Press Enter to continue with Setup.
Installer is straight forward with clean GUI and more similar to Windows 7. That’s it!
First boot will take time which will include configuring Devices and Drivers (Network, Sound, etc)
Enter Windows Live ID to enter and you are ready to experience the awesomeness of Windows 8. You can read more about Windows 8 Experience.

Click to Download our Android App